Beta 1.7.3 installation guide
JRE links
The official launcher comes with a JRE.
For other launchers (or if you want to use a different Java binary), you can use the OpenJDK builds from either of these vendors:
- Azul Zulu: https://www.azul.com/downloads/?version=java-8-lts&package=jre#zulu
- Adoptium Eclipse Temurin: https://adoptium.net/temurin/releases/?version=8
Official launcher
You might have this launcher (and a premium account) installed in most cases.
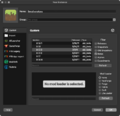
By default, it doesn't show old versions of the game before Release 1.0, and must be enabled in the settings.
 Garsooon has a video guide:
- Select the Settings tab, found in the bottom left corner.
- In the Enable Show Historical versions of Minecraft: Java Edition in the Launcher under Minecraft: Java Edition Settings in the General tab.
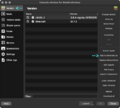
- Go back to the Minecraft: Java Edition tab on the sidebar, open the Installations tab and then select New Installation.
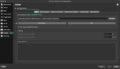
- Enter the desired name of the install, and then select
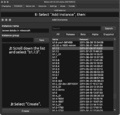
old_beta 1.7.3in the version dropdown menu, then select Create. - Click on the Minecraft: Java Edition tab on the sidebar again and select the installation you just made from the drop down menu and press Play.
MultiMC/PrismLauncher/Other forks plus BetaEvolutions
- MultiMC: https://multimc.org
- PrismLauncher: https://prismlauncher.org
BetaEvolutions can be used with these launchers.
You can deviate at some parts of this guide if you want to use a different fix, or anything else.
 lnphi has a video for installing this mod (v1 is used because this video was made before v2 was released):
⚠️ Warnings:
- Due to BetaEvolutions editing a lot of stuff, it is highly recommended that you do not use other mods whilst using it.
- (Language file edits, terrain edits and so on, are compatible, so long as BetaEvo doesn't conflict with it.)
- Make a ticket on the Discord server if you're encountering issues.
The following issues and their solutions are specific to Apple Silicon Macintoshes running macOS: (If these do not apply to you, collapse these sections.)

The Discord Rich Presence library used by BetaEvolutions currently doesn't have an arm64 version, and an x86-64 version of Java has to be used. Keep these in mind:
- Some basic computing knowledge, such as extracting files, moving, copying, etc. are mandatory.
- This fix relies on the Rosetta 2 translation layer, and hence, this fix will not work on macOS 28 and later.
 Noggisoggi made a video tutorial for this, with the Azul Zulu OpenJDK build:
- Get an x86-64 build of the JRE for macOS
- You can use the OpenJDK builds from either of these vendors:
- Azul Zulu: https://www.azul.com/downloads/?version=java-8-lts&os=macos&architecture=x86-64-bit&package=jre#zulu & download the zip/tar archive.
- There's no option to install this system-wide.
- Adoptium Eclipse Temurin: https://adoptium.net/temurin/releases/?version=8
- Select
macOSfor the Operating System x64for Architecture, andJREfor Package Type.
- Select
- If you want to install it system-wide, download the
.pkgfile. - If you want a portable install, download the
.tar.gzfile.
- This step will vary depending on what variant you downloaded:
- Open your downloads folder and:
- Extract the
.tar.gz/.ziparchive if you downloaded it. - Install the x86-64 JRE from the
.pkgfile.
- Extract the
- Open your downloads folder and:
- Open your launcher; PrismLauncher or MultiMC in this case.
- Only for portable Java installs; skip to step 4 if you're using a system-wide install:
- Select your instance of Beta 1.7.3, select Instance Folder or similar.
- Your b1.7.3 instance folder should open.
- If not: open the Finder, select View on the menu bar, then select: Go to Folder... & input one of these paths depending on your launcher:
- PrismLauncher:
~/Library/Application Support/PrismLauncher/instances - MultiMC:
/Applications/MultiMC.app/Data/instances- You need to open the context menu (
[Right Click],[Ctrl]+[Left Click]) onMultiMC.app& select Show Contents.
- You need to open the context menu (
- PrismLauncher:
- Press
[Return]or[Enter]& go to your b1.7.3 instance.
- If not: open the Finder, select View on the menu bar, then select: Go to Folder... & input one of these paths depending on your launcher:
- Copy that JRE you extracted directly into the instance folder.
- Only for portable Java installs; skip to step 4 if you're using a system-wide install:
- In MultiMC/PrismLauncher, select your b1.7.3 once more & select Edit Instance
- Select: Settings -> Java installation -> Enable (tick) Java installation
- System-wide installs:
- Select Auto-detect & select the one with:
- Version:
1.8.0_372 - Architecture:
x86_64 - Path:
/Library/Java/JavaVirtualMachines/temurin-8.jre/Contents/Home/bin/java
- Version:
- If the auto-detect method doesn't work for some reason, you can use the aforementioned path as the Java path.
- Select Auto-detect & select the one with:
- Portable installs:
- Method 1:
- Select Browse.
- A file picker should pop-up; head to
instances-> your b1.7.3 instance -> the JRE you extracted ->bin/java.
- Method 1:
- Method 2:
- Open your instance folder
- Head to
instances-> your b1.7.3 instance -> the JRE you extracted ->Contents/Home/bin/java. - Select the
javabinary.- Press
Command+Option+Cor open the context menu, holdOption& select Copy path.
- Press
- Go back to the instance editor, select the entire Java binary path & replace it with what you have copied.
- System-wide installs:
- Select: Settings -> Java installation -> Enable (tick) Java installation
You can now launch the game.

Use either (but not both) of these 2 solutions:
- Use LegacyFix: PrismLauncher, MultiMC.
- Use Dereku's M1Fix here: https://www.mediafire.com/file/k3pextx6zfdx0vg/M1Fix.zip/file
- On MultiMC/PrismLauncher/forks: Edit your b1.7.3 instance -> Version -> Add to minecraft.jar -> Select
M1Fix.zip-> Launch the game. - Don't focus on the blank window, it'll make your game unresponsive.Just minimize it.
- On MultiMC/PrismLauncher/forks: Edit your b1.7.3 instance -> Version -> Add to minecraft.jar -> Select
- Install either of the aforementioned launchers (MultiMC or PrismLauncher or what have you).
- Download BetaEvolutions from https://evolutions.retromc.org by reading and agreeing to the brief terms and conditions, and then downloading either the stable (recommended) or unstable JAR.
- Launch MultiMC (or fork), set up your account by clicking on the account selector in the top right corner, select Manage Accounts..., and then select Add Microsoft.
- Select Add Instance, and select
b1.7.3as the version by enabling Betas and scroll through the list until you see it. Change the details to your liking and select OK. - Right-click (or left-click; open context menu) the newly created instance, and select Edit, or select the same button on the sidebar after selecting the aforementioned instance.
- Version -> Add to Minecraft.jar -> Add the BetaEvolutions jar mod you downloaded.
- Don't use the Mods tab for this! (Not unless a mod loader is used.)
- Go to: Settings -> Tick Java installation -> Auto-detect if you installed the JRE system wide.
- If you downloaded the zip/tar archive, you simply extract it, select Browse in the instance settings, navigate to the extracted JRE ->
bin/javaand select thatjavafile. - Under MS Windows, use
javaw.exeinstead.
- If you downloaded the zip/tar archive, you simply extract it, select Browse in the instance settings, navigate to the extracted JRE ->
- Launch the game via Launch and pray it works.
- Image guide
-

-

-

-
-

-
-

-
-


BetaCraft launcher
https://betacraft.uk/downloads
On that page, scroll down and you'll see 2 options:
- v1, which is made in Java and is generally more stable.
- v2 (alpha), which includes easy mod support, but is generally a bit unstable.
Assuming you have either one (or both) of them installed:
2.x
ℹ️ Notice: As 2.x is in alpha, the launcher can sometimes crash. Pray that it doesn't crash.
- Select Accounts, then Add account and login with your Microsoft account.
- Select Settings, then the Java Installations tab in the left hand column.
- You should see your Java installations here, but there is a menu/button to download and install a Java distribution.
- Select the one prefixed with "
1.8.0", and in the list's lower left, select Set as default. - Apple Silicon Mac (and non-x86-64 computer/unsupported OS) users only: Settings -> General -> Disable Discord Rich presence
(Because the RPC doesn't have a version for the aforementioned platform(s).)
- Select Instances, then Add instance, then scroll down the list, and select
b1.7.3.
(Attempting to select the other tabs/searching and then selecting will crash the program.)
And also: name your instance.
Now you can select the instance and hit Play, but for those that want to install BetaEvolutions:
- Download BetaEvolutions from https://evolutions.retromc.org by reading and agreeing to the brief terms and conditions, and then downloading either the stable (recommended) or unstable JAR.
- Rename that file to have
.zipat the end if the mod file picker doesn't allow you to select it.
- Rename that file to have
- Head to the Instances tab, right-click (or left-click if you configured it that way) your b1.7.3 instance, Edit -> Mods -> Add to minecraft.jar -> select the
BetaEvolutionsFull-1.5.0.zip(or jar) file.
And select Save.
-
 Accounts tab with Noggisoggi.
 -
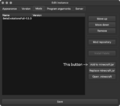
 Java installations list.
 -
 Instance creation.
 -
 Mod installation.


And now you can launch the game (hopefully without crashing).
1.x
- If for some reason your version is not set to
b1.7.3, hit Select version ->b1.7.3. - Select Login, and follow the instructions given.
- Once you log in, you can then select Edit instance if you want to change some settings - namely, the Java binary used.
- Windows:
%programfiles%\<Java distributor name>\<Java 8 or something>\bin\javaw.exe - Arch Linux, via the
jre8-openjdkpackage:/usr/lib/jvm/java-8-openjdk/bin/java - macOS (if JRE is installed system-wide):
/Library/Java/JavaVirtualMachines/<name-of-distributor>-8.jre/Contents/Home/bin/java
- Windows:
- Select OK, and select Play.

