Beta 1.7.3 installation guide
JRE links
The official launcher comes with a JRE.
For other launchers (or if you want to use a different Java binary), you can use the OpenJDK builds from either of these vendors:
- Azul Zulu: https://www.azul.com/downloads/?version=java-8-lts&package=jre#zulu
- Adoptium Eclipse Temurin: https://adoptium.net/temurin/releases/?version=8
Official launcher
You might have this launcher (and a premium account) installed in most cases.
By default, it doesn't show old versions of the game before Release 1.0, and must be enabled in the settings.
 Garsooon has a video guide:
- Select the Settings tab, found in the bottom left corner.
- In the Enable Show Historical versions of Minecraft: Java Edition in the Launcher under Minecraft: Java Edition Settings in the General tab.
- Go back to the Minecraft: Java Edition tab on the sidebar, open the Installations tab and then select New Installation.
- Enter the desired name of the install, and then select
old_beta 1.7.3in the version dropdown menu, then select Create. - Click on the Minecraft: Java Edition tab on the sidebar again and select the installation you just made from the drop down menu and press Play.
MultiMC/PrismLauncher/Other forks plus BetaEvolutions
- MultiMC: https://multimc.org
- PrismLauncher: https://prismlauncher.org
BetaEvolutions can be used with these launchers.
You can deviate at some parts of this guide if you want to use a different fix, or anything else.
 Noggisoggi has a video for installing this (and includes fixes for Apple Silicon Macs using macOS):
⚠️ Warnings:
- Due to BetaEvolutions editing a lot of stuff, it is highly recommended that you do not use other mods whilst using it.
- (Language file edits, terrain edits and so on, are compatible, so long as BetaEvo doesn't conflict with it.)
- Make a ticket on the Discord server if you're encountering issues.
The following issues and their solutions are specific to Apple Silicon Macintoshes running macOS: (If these do not apply to you, collapse these sections.)

- Install LaunchWrapper and LegacyFix (PrismLauncher, MultiMC).
- Launch the game and let it crash.
- Disable/remove LegacyFix and relaunch.
The game should boot with fixed colors and you should be able to resize the window without the game crashing.
Note that LaunchWrapper overrides your launcher's game resolution settings; to change it:
- Edit your instance, select LaunchWrapper, and select Edit.
- Scroll down until you see the
minecraftArgumentskey, append--width <w> --height <y>to its value, and save.<w>&<y>are placeholder values.
The game should launch with the resolution you set in that file.

The Discord Rich Presence library used by these versions of BetaEvolutions doesn't have an arm64 version bundled, and an x86-64 version of Java has to be used. Keep these in mind:
- Some basic computing knowledge, such as extracting files, moving, copying, etc. are mandatory.
- This fix relies on the Rosetta 2 translation layer, and hence, this fix will not work on macOS 28 and later.
Noggisoggi made a video tutorial for this, with the Azul Zulu OpenJDK build:
- Get an x86-64 build of the JRE for macOS
- You can use the OpenJDK builds from either of these vendors:
- Azul Zulu: https://www.azul.com/downloads/?version=java-8-lts&os=macos&architecture=x86-64-bit&package=jre#zulu & download the zip/tar archive.
- There's no option to install this system-wide.
- Adoptium Eclipse Temurin: https://adoptium.net/temurin/releases/?version=8
- Select
macOSfor the Operating System x64for Architecture, andJREfor Package Type.
- Select
- If you want to install it system-wide, download the
.pkgfile. - If you want a portable install, download the
.tar.gzfile.
- This step will vary depending on what variant you downloaded:
- Open your downloads folder and:
- Extract the
.tar.gz/.ziparchive if you downloaded it. - Install the x86-64 JRE from the
.pkgfile.
- Extract the
- Open your downloads folder and:
- Open your launcher; PrismLauncher or MultiMC in this case.
- Only for portable Java installs; skip to step 4 if you're using a system-wide install:
- Select your instance of Beta 1.7.3, select Instance Folder or similar.
- Your b1.7.3 instance folder should open.
- If not: open the Finder, select View on the menu bar, then select: Go to Folder... & input one of these paths depending on your launcher:
- PrismLauncher:
~/Library/Application Support/PrismLauncher/instances - MultiMC:
/Applications/MultiMC.app/Data/instances- You need to open the context menu (
[Right Click],[Ctrl]+[Left Click]) onMultiMC.app& select Show Contents.
- You need to open the context menu (
- PrismLauncher:
- Press
[Return]or[Enter]& go to your b1.7.3 instance.
- If not: open the Finder, select View on the menu bar, then select: Go to Folder... & input one of these paths depending on your launcher:
- Copy that JRE you extracted directly into the instance folder.
- Only for portable Java installs; skip to step 4 if you're using a system-wide install:
- In MultiMC/PrismLauncher, select your b1.7.3 once more & select Edit Instance
- Select: Settings -> Java installation -> Enable (tick) Java installation
- System-wide installs:
- Select Auto-detect & select the one with:
- Version:
1.8.0_372 - Architecture:
x86_64 - Path:
/Library/Java/JavaVirtualMachines/temurin-8.jre/Contents/Home/bin/java
- Version:
- If the auto-detect method doesn't work for some reason, you can use the aforementioned path as the Java path.
- Select Auto-detect & select the one with:
- Portable installs:
- Method 1:
- Select Browse.
- A file picker should pop-up; head to
instances-> your b1.7.3 instance -> the JRE you extracted ->bin/java.
- Method 1:
- Method 2:
- Open your instance folder
- Head to
instances-> your b1.7.3 instance -> the JRE you extracted ->Contents/Home/bin/java. - Select the
javabinary.- Press
Command+Option+Cor open the context menu, holdOption& select Copy path.
- Press
- Go back to the instance editor, select the entire Java binary path & replace it with what you have copied.
- System-wide installs:
- Select: Settings -> Java installation -> Enable (tick) Java installation
You can now launch the game.
- Install either of the aforementioned launchers (MultiMC or PrismLauncher or what have you).
- Download BetaEvolutions from https://evolutions.retromc.org by reading and agreeing to the brief terms and conditions, and then downloading either the stable (recommended) or unstable JAR.
- Launch MultiMC (or fork), set up your account by clicking on the account selector in the top right corner, select Manage Accounts..., and then select Add Microsoft.
- Select Add Instance, and select
b1.7.3as the version by enabling Betas and scroll through the list until you see it. Change the details to your liking and select OK. - Right-click (or left-click; open context menu) the newly created instance, and select Edit, or select the same button on the sidebar after selecting the aforementioned instance.
- Version -> Add to Minecraft.jar -> Add the BetaEvolutions jar mod you downloaded.
- Don't use the Mods tab for this! (Not unless a mod loader is used.)
- Go to: Settings -> Tick Java installation -> Auto-detect if you installed the JRE system wide.
- If you downloaded the zip/tar archive, you simply extract it, select Browse in the instance settings, navigate to the extracted JRE ->
bin/javaand select thatjavafile. - Under MS Windows, use
javaw.exeinstead.
- If you downloaded the zip/tar archive, you simply extract it, select Browse in the instance settings, navigate to the extracted JRE ->
- Launch the game via Launch and pray it works.
- Image guide
-

-

-

-
-

-
-

-
-


BetaCraft launcher
https://betacraft.uk/downloads
On that page, scroll down and you'll see 2 options:
- v1, which is made in Java and is generally more stable.
- v2 (alpha), which includes easy mod support, but is generally a bit unstable.
Assuming you have either one (or both) of them installed:
2.x
ℹ️ Notice: As 2.x is in alpha, the launcher can sometimes crash. Pray that it doesn't crash.
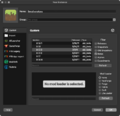
- Select Accounts, then Add account and login with your Microsoft account.
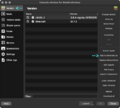
- Select Settings, then the Java Installations tab in the left hand column.
- You should see your Java installations here, but there is a menu/button to download and install a Java distribution.
- Select the one prefixed with "
1.8.0", and in the list's lower left, select Set as default. - Apple Silicon Mac (and non-x86-64 computer/unsupported OS) users only: Settings -> General -> Disable Discord Rich presence
(Because the RPC doesn't have a version for the aforementioned platform(s).)
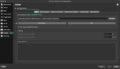
- Select Instances, then Add instance, then scroll down the list, and select
b1.7.3.
(Attempting to select the other tabs/searching and then selecting will crash the program.)
And also: name your instance.
Now you can select the instance and hit Play, but for those that want to install BetaEvolutions:
- Download BetaEvolutions from https://evolutions.retromc.org by reading and agreeing to the brief terms and conditions, and then downloading either the stable (recommended) or unstable JAR.
- Rename that file to have
.zipat the end if the mod file picker doesn't allow you to select it.
- Rename that file to have
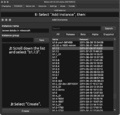
- Head to the Instances tab, right-click (or left-click if you configured it that way) your b1.7.3 instance, Edit -> Mods -> Add to minecraft.jar -> select the
BetaEvolutionsFull-1.5.0.zip(or jar) file.
And select Save.
-
 Accounts tab with Noggisoggi.
 -
 Java installations list.
 -
 Instance creation.
 -
 Mod installation.


And now you can launch the game (hopefully without crashing).
1.x
- If for some reason your version is not set to
b1.7.3, hit Select version ->b1.7.3. - Select Login, and follow the instructions given.
- Once you log in, you can then select Edit instance if you want to change some settings - namely, the Java binary used.
- Windows:
%programfiles%\<Java distributor name>\<Java 8 or something>\bin\javaw.exe - Arch Linux, via the
jre8-openjdkpackage:/usr/lib/jvm/java-8-openjdk/bin/java - macOS (if JRE is installed system-wide):
/Library/Java/JavaVirtualMachines/<name-of-distributor>-8.jre/Contents/Home/bin/java
- Windows:
- Select OK, and select Play.

