Setting up a Project Poseidon Plugin: Difference between revisions
Jump to navigation
Jump to search
No edit summary |
No edit summary |
||
| Line 103: | Line 103: | ||
</li></ol> | </li></ol> | ||
<br> | <br> | ||
Upon starting the server, the "Hello World! message can be seen in the server console. | Upon starting the server, the "Hello World!" message can be seen in the server console. | ||
<dl><dd>[[File:poseidonplugin11.png|thumb|none|600px]]</dd><dl> | <dl><dd>[[File:poseidonplugin11.png|thumb|none|600px]]</dd><dl> | ||
Revision as of 17:47, 3 September 2024
ℹ️ Notice: Before following this guide, make sure you have a Java IDE installed which supports creating Maven projects. It is also recommended to use a Java 8 OpenJDK build.
 zavdav will be using IntelliJ IDEA and the Azul Zulu OpenJDK build for this guide.
- Open your IDE and create a new Maven project
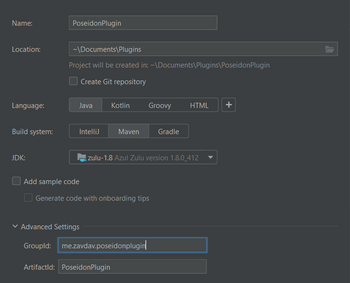
- When creating a project, choose a Group ID. In most cases, it should look like this:
me.<yourname>.<pluginname>
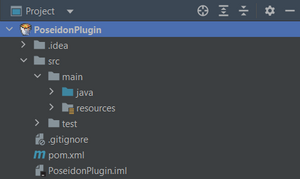
For more information, go to https://docs.oracle.com/javase/tutorial/java/package/namingpkgs.html - After creating the project, your project structure should look like this:
- Go into the
resourcesfolder and create a new file calledplugin.yml - In
plugin.yml, insert these values:- name: The name of the plugin
- main: The main class of the plugin (has to inherit
org.bukkit.plugin.java.JavaPlugin) - version: The version of the plugin
- In the
src/main/javafolder, create a new package with the same name as your Group ID. - In this package, create a new class with the same name as specified in
plugin.yml. - Open the file called
pom.xmland paste the following text into the file:


<?xml version="1.0" encoding="UTF-8" ?>
<project xmlns="http://maven.apache.org/POM/4.0.0"
         xmlns:xsi="http://www.w3.org/2001/XMLSchema-instance"
         xsi:schemaLocation="http://maven.apache.org/POM/4.0.0 http://maven.apache.org/xsd/maven-4.0.0.xsd">

    <modelVersion>4.0.0</modelVersion>
    <groupId>me.yourname.pluginname</groupId>
    <artifactId>ProjectName</artifactId>
    <version>1.0</version>
    <packaging>jar</packaging>

    <name>PluginName</name>

    <properties>
        <java.version>1.8</java.version>
        <project.build.sourceEncoding>UTF-8</project.build.sourceEncoding>
    </properties>

    <repositories>
        <repository>
            <id>johnymuffin-nexus-releases</id>
            <url>https://repository.johnymuffin.com/repository/maven-public/</url>
            <releases>
                <enabled>true</enabled>
            </releases>
            <snapshots>
                <enabled>false</enabled>
            </snapshots>
        </repository>
    </repositories>

    <build>
        <plugins>
            <plugin>
                <groupId>org.apache.maven.plugins</groupId>
                <artifactId>maven-compiler-plugin</artifactId>
                <version>3.11.0</version>
                <configuration>
                    <source>1.8</source>
                    <target>1.8</target>
                </configuration>
            </plugin>
        </plugins>
        <resources>
            <resource>
                <directory>src/main/resources</directory>
                <filtering>true</filtering>
            </resource>
        </resources>
    </build>

    <dependencies>
        <dependency>
            <groupId>com.legacyminecraft.poseidon</groupId>
            <artifactId>poseidon-craftbukkit</artifactId>
            <version>1.1.8</version>
        </dependency>
    </dependencies>

</project>
- This will tell Maven to use the source files from the Project Poseidon repository when compiling and to compile the plugin in Java 8.
Make sure to replace<groupId>,<artifactId>and<name>according to your project structure.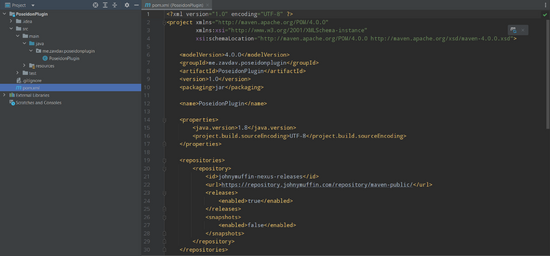

- Go into your IDE's terminal and run
mvn clean package - Reload your Maven project
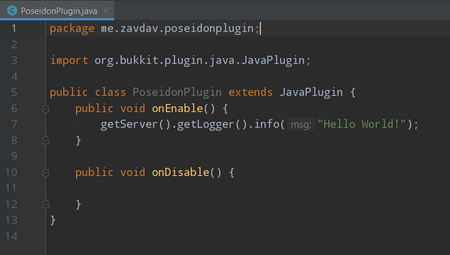
- Write some code
- For demonstration purposes,
zavdav has added a simple "Hello World!" message that will be displayed in the server console.
- For demonstration purposes,
- Run
mvn clean packagein the terminal- The compiled jar file should be in the
targetdirectory inside your project.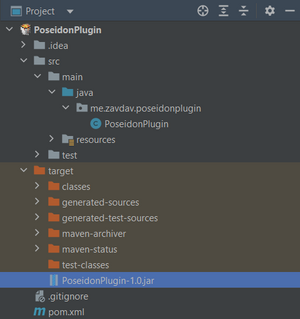
- The compiled jar file should be in the
- Copy the jar file into the
pluginsfolder of your Project Poseidon server.


Upon starting the server, the "Hello World!" message can be seen in the server console.
